GitHub Actions is an immensely useful CI/CD tool. It allows you to automate your software workflows, from builds, to code quality checks, to deployments.
Like many software teams, mine quickly recognised its usefulness. In the Engineering Productivity team at Adevinta, we take care of providing a platform for developers: enabling other teams to painlessly create new applications, enforce common standards and monitor team productivity.
We first started using GitHub Actions within my team, and very soon, the entire company decided to switch to it. Due to the complexity of the work, a task force was organized consisting of members of different teams; with one goal — to bring GitHub Actions to the rest of Adevinta.
With the big switch came a different class of problems — how to make it production-ready.
Imagine you work in a team handling several different projects with similar workflows. First, you copy and paste the same code everywhere. But later you have an idea to create an action of your own and simplify your job.
So you make one.
The first version is simple, appears to do precisely what you want it to do, and returns no errors.
Done, right?
But then other people start using your new action and the trouble begins …
Step 0: Create a basic action
Our example is a simple action: fetching a file from a remote server and printing it out.
name: URL Printer
description: This action prints out the file fetched from the URL

runs:
  using: "composite"
  steps:
    - name: Fetch and print
      shell: bash
      run: |
        curl $FILE_URL --silent --output my.file
        cat my.file
Let’s use it in a workflow:
name: My workflow

on:
  workflow_dispatch:

env:
  FILE_URL: https://pastebin.com/raw/qWZh5tjv

jobs:
  print-url:
    runs-on: medium
    steps:
      - uses: actions/checkout@v3
      - uses: ./.github/actions/url-printer
And here is the output — some traditional Lorem Ipsum:

Step 1: Validate environment variables
Now one of our colleagues decides to use our action in their project. Of course, they don’t know about FILE_URL. It’s an environment variable not an input, and we didn’t document it anywhere.
Unlike inputs, validated by default, environment variables are just expected to exist, defined in the workflow file. GitHub Actions don’t require their definition as part of the inputs. What happens if they are missing, must be defined in your code.
What we are going to do is add a new step which will verify if all required environment variables are present. Using bash we can confirm the presence of a variable and exit with an error code if it is missing.
name: File Printer
description: This action prints out the file fetched from the URL

runs:
  using: "composite"
  steps:
    - name: Check required environment variables
      shell: bash
      run: |
         if [ -z ${FILE_URL+x} ]; then echo "FILE_URL is required"; exit 1; fi

    - name: Fetch and print
      shell: bash
      run: |
        curl $FILE_URL --silent --output my.file
        cat my.file
So now if we attempt to run the action without supplying a FILE_URL variable we will get a well-defined error:

Step 2: Logging Improvements
Debug logging
Sometimes default logs don’t provide enough information to diagnose problems in the workflow.
This is where debug logging proves helpful.
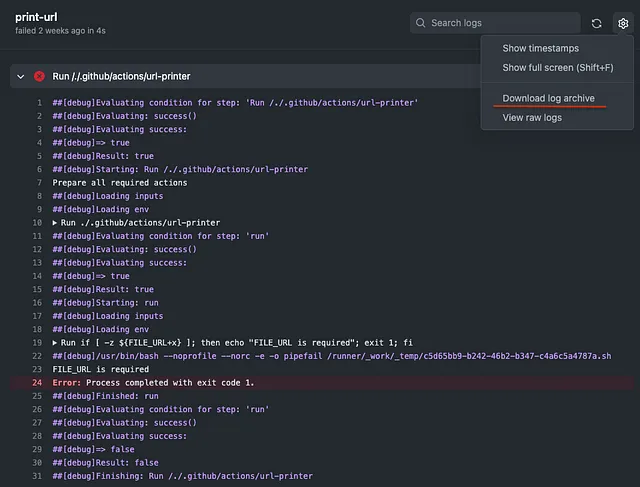
To enable debug logs in the workflow, create a new repository secret in repository settings called ACTIONS_STEP_DEBUG with value true.
Logs will become much more verbose, so it should not be enabled any longer than needed to debug the issue.

There is also a somewhat hidden option to download logs, located in the upper right corner.
Colouring and Formatting Logs
Having a lot of logs is nice, but it can get overwhelming reading through all of them and finding the right line you are interested in.
Luckily GitHub Actions support some formatting options like:
- Full ANSI 24-bit spectrum of colour escape sequences
- Creating collapsible log groups
- Setting custom error and warning messages in the UI
Let’s combine this and beautify our log output:
name: File Printer
description: This action prints out the file fetched from the URL

runs:
  using: "composite"
  steps:
    - name: Check required environment variables
      shell: bash
      run: |
        if [ -z ${FILE_URL+x} ]; then echo "::error file=action.yml,line=16::FILE_URL"; exit 1; fi

    - name: Fetch and print
      shell: bash
      run: |
        echo -e "\u001b[36mStarting to fetch file\u001b[0m"
        curl $FILE_URL --silent --output my.file
        echo "::group::File Output"
        cat my.file
        echo "::endgroup::"
        echo -e "\u001b[32m\xE2\x9C\x94\u001b[0m file successfully printed"
You can see that the file output is now collapsed behind a “File Output” section, and clicking on the arrow will reveal it. There is also some coloured text and a green checkmark.

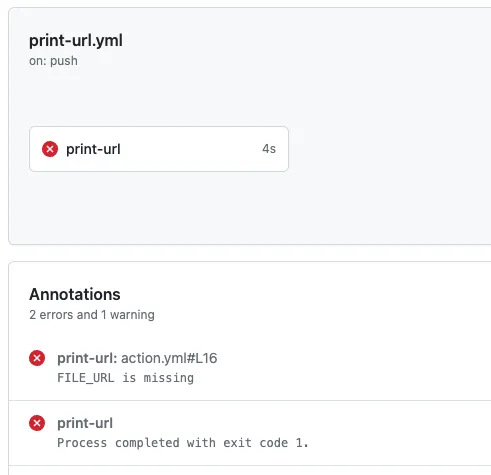
If we remove the FILE_URL variable and rerun the action, we now get an error in the UI, without having to open the logs.

Step 3: Write Clear and Concise Documentation
Documentation is an essential part of any Action, as it helps users understand what your action does, how to use it and how to customise it.
There are two main places to document an Action: README.md file and the action.yml file.
- The action.yml file, alongside the action steps themselves, provides the metadata and inputs of your action.
- The README.md file provides a high-level overview of your action, features, inputs, outputs and some examples of usage.
To write clear and concise documentation, there are some best practices to follow, such as:
- Document all the inputs and outputs of your action in the README.md file.
- Use descriptive and consistent names for your action, inputs, outputs and variables. Avoid using abbreviations or acronyms that may confuse your users.
- Briefly summarise what your action does at the beginning of your README.md. Explain your action’s main benefits and use cases, and link to any relevant resources or documentation.
- Use headings, lists, tables, code blocks and other markdown elements to organise and format your documentation.
- Provide examples of how to use your action in different scenarios and workflows. Use syntax highlighting and comments to explain the code snippets. Include screenshots if they help illustrate the results or behaviour of your action.
This README template has proven helpful to us:
# Action Name

## What
This action fetches a file from the given URL and prints it out in the logs.

## Prerequisites

For the action to work you need ...

## Interface

### Inputs
| **Name**       | **Description** | **Required** |
|----------------|:---------------:|--------------|
| `input1`       | Input 1         | Yes          |
| `input2`       | Input 2         | No           |

### Environment variables
| **Name**       | **Description**        | **Required** |
|----------------|:----------------------:|--------------|
| ENV_VAR_1      | Environment variable 1 | Yes          |
| ENV_VAR_2      | Environment variable 2 | No           |

### Outputs
| **Name**       | **Description**        |
|----------------|:----------------------:|
| `output1`      | Output 1               |
| `output2`      | Output 2               |

## Use cases
<describe use cases>

### 1. Case 1

### 2. Case 2
Step 4: Open Problem — Monitor and Measure Your Action
There might be multiple reasons to track the metrics of your action:
- Monitoring usage
- Monitoring performance
- Tracking what issues users experience
Unfortunately, Github doesn’t provide any default way to monitor your Actions besides UI. Meaning no alerts or aggregated metrics.
At this moment, we are still exploring how to best answer this. The options we are looking at are:
Webhooks
Github can send an event to a webhook each time a Workflow runs. However, these events don’t contain information about which action was executed, or any detailed output other than success/error.
Integrating into Action
Another option is to send metrics through a custom API call from the action itself. A separate step with a condition if: always() ensures it is always sent despite success or failure of the main job. The problem here is increasing workflow complexity and its dependence on a custom implementation.
Conclusion
In this article, we have seen how to improve our usage of GitHub Actions by evolving one from basic to production-ready.
There is only one more question to answer — is it worth it?
Yes, absolutely.
In the saturated CI/CD market GitHub Actions offers advantages its competitors lack, despite gaps noted in the monitoring and metrics space. Tight integration with the rest of the GitHub ecosystem, and quality of life improvements mentioned in this article make it a tool worth using.


